Click here to download the datasheet

Sincerely thank you for purchasing our products
Please read manual carefully before use
Please read and save these instructions. Read carefully before attempting to assemble, install, operates or maintains the product described.
Protect yourself and others by observing all safety information. Failure to comply with instructions could result in personal injury and / or property damage! Retain instructions for future reference.
Description
COOLmax Portable Air Conditioners feature spot cooling for large areas where cooling of the entire area is not practical. A dedicated spot cooling thermostat controls the unit in this application.
This air conditioner can also be used in smaller areas for room cooling. A control panel provides ease of use and contains a self-diagnostic function and display, showing operating modes, room and set temperatures, and faults.
If an abnormal operation occurs, a visual display of the fault is shown. Caster wheels are included for easy portability. Suitable applications include: a factory or work place, industrial kitchen, computer room, emergency cooling, outdoor event, etc.
Unpacking
After unpacking the unit, carefully inspect unit for any damage that may have occurred during transit. Check for any loose, missing, or damaged parts.
Specifications
| Model | COOLmax-52 | COOLmax-72 |
| Voltage (V/Hz) | 220/50 | 220/50 |
| Power (kw) | 6.18 | 7.50 |
| Capacity (Btu) | 21086 | 25800 |
| Refrigerant | R22 / R407C | R22 / R407C |
| Water disposal (L) | 25 | 25 |
| Air flow (m3/h) | 1000 | 1200 |
| Net Weight (kg) | 84 | 90 |
| Outlet (mm) | 2x150x450 | 2x150x450 |
| Length of power cord (m) | 3 | 3 |
| Packing
Size (LxWxH) (mm) Loading Qty. (PCS) 20’GP/40’GP/40’HQ
Safety Devices
Features |
530x630x1350 530x630x1350
36/76/76 36/76/76
Compressors overload protector, Anti-freezing thermostat, Full drain tank switch, Compressor time delay program, High pressure switch.
Temperature control, Self-diagnostic function, Two speed fan, Optional drain pump kit, Washable filters, °F (°C) display. |
|
General Safety Information
Please read this manual carefully for instructions on correct installation and usage. Please follow rod all safeguards.
- Transport and store the unit in an upright position only. Leave unit in an upright position for at least 3 hours before first use.
- Always place the unit on an even, level surface.
- Ensure the unit is connected to a grounded power supply of the correct rating/capacity.
- The unit will cool when the room temperature is between 18°C (64°F) – 45°C (113°F) depending on the thermostat setting.
- DO NOT use this unit for functions other than those described in this instruction manual.
- DO NOT tilt the unit.
- DO NOT cover or obstruct the unit’s inlet and outlet grilles.
- DO NOT use the unit in areas where it will be exposed to rain or water.
- NEVER unplug the unit while it is operating.
DO NOT use the unit in wet environments, such as a laundry room, to avoid the risk of electrical shock.
- DO NOT place any foreign objects on the unit.
- DO NOT operate the unit with wet or damp hands.
- DO NOT allow chemical substances to come into contact with the unit.
- DO NOT operate the unit in the presence of flammable substances or vapors such as alcohols, pesticides, gasoline, etc.
DO NOT operate the unit in explosive or flammable environments.
- DO NOT use the plug to start and to stop the unit. Always use the control panel to start and to stop the unit.
- Always turn off the unit when it is not in use and unplug the power plug from the electrical outlet.
- Always turn the unit off and unplug the main power plug from the electrical outlet before cleaning, moving or performing maintenance.
- AVOID the use of adapter plugs or extension cords. If it is necessary to use an extension cord or an adapter plug to operate the unit, ensure that they are correctly rated for the application. Consult a local qualified electrician and all local electrical codes to ensure proper setup. Any extension cord used with this device must be rated for a minimum of 20A.
- DO NOT unplug the unit by pulling on the electrical cord. Keep electrical cord away from heat sources and always completely unroll the cord to avoid overheating. If the power cord be-comes damaged, a qualified service agent, qualified electrician, or similarly qualified person must replace it, in order to avoid a hazard or shock.
DO NOT operate a unit with a damaged power cord.
- The filters must be used with the product at all times. When the filters are removed for cleaning, always ensure that the unit has been turned off and unplugged from the electrical outlet.
- Regularly clean the filters to maintain efficiency. If the filters are not cleaned regularly, the unit’s output performance and efficiency will decline and energy consumption will increase.
- DO NOT operate the unit with a damaged power cord or plug, after it malfunctions, has been dropped or damaged.
- Only use in the upright position on an even, flat surface. Unit must be positioned at least 24 inches (60cm) from the nearest object in any direction.
- Stop operation immediately if abnormal noise or odor is noticed. Contract a local service center.
- Appliance is not to use by children or persons with reduced physical, sensory or mental capabilities, or lack of experience and knowledge, unless they have been given supervision or instruction.
- Children being supervised not to play with appliance.
- That the appliance shall be installed in accordance with national wiring regulations.
- If the supply cord is damaged, it must be replaced by the manufacturer, its service agent or similarly qualified persons in order to avoid a hazard.
Assembly
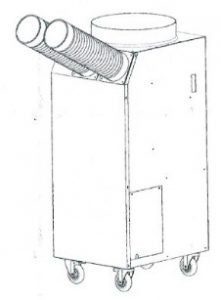
Accessories: 2 root air duct 8pcs self-tapping screws
Please assembly as shown in Figure:

- Remove cool air outlet hose(s) from carton.
- Place the cool air outlet hose(s) on the front top of air conditioner.
- Use screws (enclosed inside of box with cool air outlet hose(s) to install the cool air outlet hose(s) on the air conditioner as shown in picture.
COMPONENT PARTS


Installation
WARNINGS REGARDING PROPER LOCATION FOR INSTALLATION
Do not use the unit in explosive environments or in areas where flammable gas leakage may occur.
Do not use the unit in areas where it will be exposed to rain or water.
Do not use the unit in a corrosive atmosphere.
Do not use the unit when room temperature below 18°C or set temperature below 18°C.
Do not install the unit on uneven or sloping surface. The unit may roll or topple over even if the casters are set to the locked position.
MOVING THE UNIT
Unlock the casters and push the unit using the side handles to a flat, level surface and set the caster brakes to the locked position.
PLUGGING IN THE UNIT
Check the prongs and surface of the power cord plug for dust/dirt. If dust and/or dirt are present, wipe off with a clean, dry cloth.
If any damage or excess play is found, contact a qualified repair technician or a qualified electrician to perform replacement or repair of the power cord, plug or prongs.
If the power cord or plug is damaged, repair should only be performed by qualified electrical personnel.
Do not connect/disconnect the power cord or attempt to operate buttons with wet hands. This could result in electrical shock.
NOTE: Make sure the AC outlet is free of dirt, dust, oil, water, or any other foreign material.
Operation
CONTROL PANEL

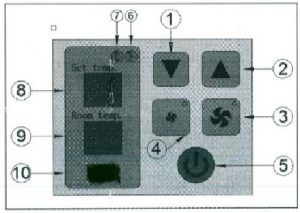
- SET TEMP BUTTONS: Change target temperature/data value by +/-1. Change data value by +/- 10 by pressing continually. Press the SET TEMP BUTTONS to set temperature. Upper button is to heighten temperature and Lower button is to lower temperature.
- BLOWER BUTTON: Changes fan speed from low to High when pressed.
- BLOWER BUTTON: Changes fan speed from high to low when pressed.
- POWER BUTTOM: Activates unit when POWER BUTTON is pressed. (Fan starts on low speed). If power button is pressed during operation, unit stops.
- Fahrenheit temperature indicator;
- Celsius temperature indicator;
- TARGET TEMP: displays the unit set temperature for ROOM/COOL mode only.
- CURRENT TEMP: Displays current room temperature in display in Fahrenheit. (In Room Cool Mode only). SPOT/COOL Mode-Displays outlet (cool air) temperature during normal operations.
- Our Company Logo.
Maintenance
FILTER CLEANING
There are two filters in the unit. The evaporative filter is located at the front of the unit. The condenser filter is located at the side of the unit.
- Loosen up 2 bolts on the front filter guard.
- Slide filter up and use a vacuum cleaner to remove the dust from the filter.
- If the filter is heavily covered with dust and dirt, warm water and mild soap or neutral detergent may be used to wash the filter. Do not use any other chemicals to clean filter, as they will likely damage the filter.
- Dry the filter in a shaded are before replacing it. Do not operate the unit without the filter installed and the filter guard in the closed position.
- Replace the clean filter and close the filter guard.
- To clean the condenser filter, lift up on the side filter from the middle bar slightly and then angle the filter outwards from the bottom and remove.
- Use the same cleaning procedures as above (3-5).
- To replace the condenser filter, place the top of the filter in the guide and slide the filter up until the bottom of the filter clears the frame. Then push the bottom of filter into the guide and let filter gently fall inside the guide.
NOTE: For effective cooling clean the filter at least every 2 weeks.
Do not operate without the filter fitted.
Do not operate the unit with a damaged cord or plug, after the unit malfunctions, or if the unit has been dropped or damaged.
- For your convenience, record the complete model number and product name (located on the Product Identification Plate), the purchase date, purchase location, serial number, and warranty period in the table below.
- Also, attach your purchase receipt as proof of purchase to this instruction manual for future reference.
- To ensure your product is covered by warranty, the complete faulty product along with your original purchase receipt must be provided at the place of purchase.
- To ensure your products is covered by warranty, the complete faulty product along with your original purchase receipt must be provided at the place of purchase.
SELF-DIAGNOSTIC CODES
Fault code
| Fault | Code | Introductions |
| Room temperature sensor fault | E1 | RT1 Temperature sensor short circuit or open circuit |
| Coil sensor fault | E2 | RT2 Temperature sensor short circuit or open circuit |
| High-pressure protection | HP | High pressure switch is Closed |
| Low-voltage protection | LP | Low pressure switch is Closed |
| Over-current protection | PA | The compressor over-current protection |
| Tank protection | PB | Water tank not placed in the correct location |
| Water level alarm | LF | When water tank is full. An alarm will be displayed. Empty the tank and replace to resume operation. |
Troubleshooting chart
| Symptom | Possible Cause(s) | Corrective Action |
| Water leakage | High water level in condensate tank | 1. Remove blockage from drain hose
2. Remove any object stuck underneath of the black panel under the water tank. |
| The unit doesn’t work | 1. Check the power supply to verify that power is available to the unit
2. Verify that the power cord is connected |
1. Reset the circuit breaker and restart the unit
2. Connect power cord |
| No cold air flows from the cold air outlet | 1. Ambient air cannot be properly cooled if the filter is dirty and not regularly cleaned
2. Compressor will not work if the unit is turned off and on quickly. 3. The ambient air temperature may be too high |
1. Clean the filter
2. Wait 2 minutes after unit is turned off before turning the unit back on. 3. The temperature of the compressor can be higher when the ambient temperature is too high. The compressor will not work unless the ambient air temperature is within the acceptable operating range of the unit |
| Water flow can be heard after compressor shuts off | No cause | Common to hear coolant flowing after unit shuts off |

